Showing posts with label Android. Show all posts

Tuesday, 1 May 2018

Radio Times, Radio Measures.


There are times when you find yourself in a state where things are out of control just like a RadioButton.

Weird behaviours crop out while you try to add a radio button to your layout dynamically or inflated from layout.

Some times the 
button's drawables doesn't appear at all, sometimes it appears unexpected. 

So for such a scenario, there is a cure in few steps as follows:

1. Try to use AppCompatRadioButton from support library. Set a custom style to it which extends from "@android:style/Widget.Holo.CompoundButton.RadioButton"

<style name="RadioButtonStyle" parent="@android:style/Widget.Holo.CompoundButton.RadioButton">
        <item name="buttonTint">@color/coke_red</item>
        <item name="android:textSize">@dimen/dialog_common_transaction_item_details_text_view</item>
        <item name="android:typeface">normal</item>
        <item name="android:button">@drawable/custom_radio_selector</item>
</style>

2. Add two image drawables, one for checked and other for unchecked state.

3. Create a custom drawable selector "custom_radio_selector.xml"


<?xml version="1.0" encoding="utf-8"?>

<selector xmlns:android="http://schemas.android.com/apk/res/android">

    <item android:state_checked="true" android:state_window_focused="false"

        android:drawable="@drawable/ic_radio_on" />

    <item android:state_checked="false" android:state_window_focused="false"

        android:drawable="@drawable/ic_radio_off" />


    <item android:state_checked="true" android:state_pressed="true"

        android:drawable="@drawable/ic_radio_on" />

    <item android:state_checked="false" android:state_pressed="true"

        android:drawable="@drawable/ic_radio_off" />


    <item android:state_checked="true" android:state_focused="true"

        android:drawable="@drawable/ic_radio_on" />

    <item android:state_checked="false" android:state_focused="true"

        android:drawable="@drawable/ic_radio_off" />


    <item android:state_checked="false" android:drawable="@drawable/ic_radio_off" />

    <item android:state_checked="true" android:drawable="@drawable/ic_radio_on" />

</selector>


where ic_radio_off.png and ic_radio_on.png are the image drawbles added as required.

Demo:


Tuesday, 6 February 2018

Android EditText : Input Filter with Restrictions

Note : This post is not about InputFilter but about Restriction Filter for an Android EditText.
If visited page by mistake, one could follow Ctrl+W (on Firefox).


InputFilter interface's following method is origin of all such rules.

@Override
public CharSequence filter(CharSequence source, int start, int end, Spanned dest, int dstart, int dend){
  // Governs what to input and what not to
}

So first let's get to know some use cases of InputFilter before we actually show how we created a restriction filter out of it.

InputFilter is very easy in cases where we have to use it to
1. restrict characters from input at certain positions.
2. restrict characters from deletion from certain positions.

Above cases can be easily handled by checking only three parameters of the  interface's implemented filter() method as :
1. source -> input content going to be added .
2. dstart -> starting position where it is to be placed.
3. dend -> ending position where it is to be placed.


Please follow this simple example demoing a non-editable country code for PhoneNumber EditText  (Note : World knows about TextWatcher as well :))


class CountryCodeInputFilter implements InputFilter {
        
        @Override
        public CharSequence filter(CharSequence source, int start, int end, Spanned dest, int dstart, int dend) {
            //Back Key Press conditions
            boolean deleteCond0 = dstart == 0 && dend == 1; // +
            boolean deleteCond1 = dstart == 1 && dend == 2; // 9
            boolean deleteCond2 = dstart == 2 && dend == 3; // 5

            boolean insertCond0 = dstart == 0 && dend == 0; // ahead of +
            boolean insertCond1 = dstart == 1 && dend == 1; // ahead of 9
            boolean insertCond2 = dstart == 2 && dend == 2; // ahead of 5

            // Handling Back Key Presses
            if ((deleteCond0 || deleteCond1 || deleteCond2) && (source.equals(""))) {
                // BackPress
                if (deleteCond0) {
                    return "+";
                } else if (deleteCond1) {
                    return "9";
                } else {
                    return "5";
                }
            }

            // Handling insertions at invalid positions
            if ((insertCond0 || insertCond1 || insertCond2) && (!source.equals(""))) {
                return "";
            }

            return null;
        }
}

Got updates ?
Welcome.


Android UI and Inflate Exception

Error : Inflate Exception : Binary xml .....


I can't say how frequently you guys face this error but when it occurs surely takes quite time.

Whenever one face such an exception, the greatest possibility is with the child view not being able to initialize correctly which could be due to the following reasons :


1. The layout file must be including some CustomView which is not being correctly referenced or sometimes if it is referenced, there could be some error with in the implementation (one reason of which could be the absence of constructor with attribute set, theme etc.)


2. If you think that case one is checked, then please check once for the view that causes the inflation failure. Need to check if the drawing is successful for that view.

You will get the easiest reasons quickly but one of the most elusive causal reason is the error in background drawable which may or may not give error at compile time.

So little digging is required here.

Tuesday, 6 September 2016

ROWING without OARS : Vexed case of NavigationDrawer with AppCompatActivity and Causal Flaws.


This post is about resolving few issues with the implementation of NavigationDrawer with AppCompatActivity. 


Really?
Na.
Well its more than that.

As there are always two ways for everything, so does exists two ways to implement a NavigationDrawer.

a). Conventional way of creating navigation drawer using a ListView and a FrameLayout hosting fragments.
b). Designer's way to create navigation drawer using  NavigationView and a headerlayout to show a profile picture. 

This issue started when to speed up some task, I preferred using conventional Navigation Drawer instead of new NavigationView based drawer from Design Support Library.


1. Started working with NaviagtionDrawer with an activtiy extending from AppCompatActivity.
   Everything will be good when you will create a layout with DrawerLayout as its root element and inside it residing a FrameLayout and a ListView.
   You will set the contentView to the activity and refer each view, set listeners to each etc.
 
   Issue : ListView fills screen irrespective of whatever layout_width and layout_height you set and lie over the content frame layout.
   Cause & Resolution : never forget this attribute android:layout_gravity="start" 

   It was a mistake because it wasn't an act of Copy-Paste.


2. Next one is also very silly as you must update/upgrade with time. If you don't, get ready for consequences. How to show the hamburger icon ?
 
   Issue : Hamburger icon not showing
   Cause & Resolution : When use ActionBarDrawerToggle, use the class from  android.support.v7.app.ActionBarDrawerToggle instead of android.support.v4.app.ActionBarDrawerToggle;


        mActionBarDrawerToggle = new ActionBarDrawerToggle(this, mDrawerLayout, R.string.open_drawer
                , R.string.close_drawer) {
            @Override
            public void onDrawerOpened(View drawerView) {
                super.onDrawerOpened(drawerView);
                supportInvalidateOptionsMenu();
            }

            @Override
            public void onDrawerClosed(View drawerView) {
                super.onDrawerClosed(drawerView);
                supportInvalidateOptionsMenu();
            }
        };
 

    //  Also update your Actionbar accordingly
       ActionBar actionBar = getSupportActionBar();

        actionBar.setDisplayShowHomeEnabled(true);
        actionBar.setDisplayHomeAsUpEnabled(true);
        actionBar.setDisplayShowTitleEnabled(true);

3. Last but not the least how to enable the toggling of hamburger icon. 

    @Override
    public boolean onOptionsItemSelected(MenuItem item) {
        // Pass the event to ActionBarDrawerToggle, if it returns true, then it has handled the app icon touch event
        
if (mActionBarDrawerToggle.onOptionsItemSelected(item)) {
            return true;
        }
        
        return super.onOptionsItemSelected(item);
    }


Few more points to take care if Navigation Drawer is not showing and and no action on click of hamburger icon.

    @Override
    protected void onPostCreate(@Nullable Bundle savedInstanceState) {
        super.onPostCreate(savedInstanceState);
        mActionBarDrawerToggle.syncState();
    }

    @Override
    public void onConfigurationChanged(Configuration newConfig) {
        super.onConfigurationChanged(newConfig);
        mActionBarDrawerToggle.onConfigurationChanged(newConfig);
    }


PS : It's not that following this post and learning from my mistakes may end all the problems related to Navigation Drawer. 
You might create greater problems than I what I did. But you can work out the above given issues.


Tuesday, 9 February 2016

Google Cloud ApiEndPoints and their Initial Denials

Once I thought of :
-> Creating an appengine project
-> Creating backend api for the same project (Part of Google Cloud EndPoints)
-> Integrating Cloud Endpoints with an Android App.

and then one day finally after a long struggle streak I was able to create both.
Well I was not here to make a fuss about it, instead I am here to let you know about a minor issue (Really. Can't say) and few more implementation tips down the road.

Assumptions :
A GAE python project ready to do render some html and ready endpoints to serve.
Reader must have played a little with Google App Engine with Python .


This blog post informs about three things :

1. Issue with Backend api : It would have been little cumbersome if followed conventional process instead of endpoints proto datastore library .
It's implementation alone could be a very big blog post. That's why I will not write about it. Please do it on your own.

2. Create discovery document and client libraries (specifically java lib for Android) to directly interact with app engine backend.

3. Respective android app's build.gradle changes while adding end point lib to an android app.

4. Points to remember before testing with local and live environment


Backend Api Issue

In app.yaml (configuration file which tells what (files) is responsible for whatever appears)
I added entries for both type of handlers
a. wsgi-compliant application : handler that make this project acts as a simple web application
b. endpoints handler : handler that contains the code for api end points

handlers:

# Endpoints handler
- url: /_ah/spi/.*
  script: myModule.endpointApp

# All Request Handler
- url: /.*
  script: myOtherModule.App


Above is the correct order so as to get both handler working simultaneously but if you had the changed the order of declaration, you would have lost endpoints.
Nothing would have appeared there.

Note of Caution : Above thing may or may not be correct for all as I don't see any logic in that or didn't found any post that could tell this thing but yes it did solved my problem.


Create discovery document and client libraries

While generating client libraries, you should be in the root of project to create Google discovery document

1. Generating Google Discovery Document using command :
$ endpointscfg.py get_discovery_doc your_module.YourServiceClass
implies
$ endpointscfg.py get_discovery_doc fileNameOfApiDeclaration.NameOfClassDecoratedWith@endpoints.api
or
$ endpointscfg.py get_discovery_doc --format rpc MyModule.MyApi

example : 
$ endpointscfg.py get_discovery_doc MyModule.MyApi


2. Generate client library bundle using command :
$ endpointscfg.py get_client_lib java -bs desired_client_bundle your_module.YourServiceClass
implies
$ endpointscfg.py get_client_lib java -bs desired_client_bundle fileNameOfApiDeclaration.NameOfClassDecoratedWith@endpoints.api

Following line didn't worked out
$ endpointscfg.py get_client_lib java -bs desired_client_bundle MyModule.MyApi

And then found following in some blog
$ endpointscfg.py get_client_lib java --hostname localhost:8080 MyModule.MyApi
which was modified to following
$ endpointscfg.py get_client_lib java MyModule.MyApi  
     
        // Last one worked out successfully

Note : $ endpointscfg.py means this tool to generate client lib is in your path. So you can run it directly from terminal else you will need to navigate to the directory where it is present.


In Android Side, don't go with the obsolete documentation on how to integrate client library with the project (means don't go adding multiple libraries and then also updating gradle and hence ending up with errors in count of hundreds)

Just get the source file from the extracted source code files from java client lib and add as source in your project

Respective build.gradle changes while adding end point lib to an android app

1. Initially add following repositories :

buildscript {
    repositories {
        mavenCentral()
    }
    dependencies {
        classpath 'com.android.tools.build:gradle:1.5.0'
    }
}

apply plugin: 'com.android.application'

repositories {
    mavenCentral()
    mavenLocal()
}


2. Enable multidex

defaultConfig {
.......
        multiDexEnabled true
    }


3. Add the following dependencies :

dependencies {
    compile fileTree(include: ['*.jar'], dir: 'libs')
    testCompile 'junit:junit:4.12'
    compile 'com.android.support:appcompat-v7:23.1.1'
    compile 'com.android.support:design:23.1.1'
    compile 'com.android.support:multidex:1.0.0'
    compile ([group: 'com.google.api-client', name: 'google-api-client-android', version: '1.21.0'])
}


Testing from simulator/phone :

Url's to access api endpoint explorer on machine's localhost

1. Android Emulator : http://10.0.2.2:8080/_ah/api/
2. Genymotion : http://10.0.3.2:8080/_ah/api/
3. Physical Device : http://<your_machine_ip>:8080/_ah/api/

Note : Localhost or 127.0.0.1 refers to the emulated device itself, not the host the emulator is running on.

Once you are done uploading api endpoints code to Google api console, you can update url to

4. http://<project_id>.appspot.com/_ah/api/  (Project Id : post registration of your project on api console)


References : Cloud Api End Points

I know you have issues, please write down in the comments.

Thursday, 24 December 2015

Curious Case of RecyclerView


Sorry for the title as I was supposed to write Serious instead of Curious but no problem that will work too.

Assumptions :
1. Done with the most simplest implementation of the RecyclerView.
2. Provided options to each list item for deleting it.

So in this post we will not discuss about the RecyclerView implementation and adding options to add/delete item from it. 

We will be discussing about an issue that will occur for sure if implementation is not done with some care.

While implementation RecyclerView, there appears an inconsistency while adding and deleting items leading to an issue with addition and deletion of items from the list due to list not getting reset causing unchanged item indexes in the list.

A very frequent example of crash :
Delete second last item and then try deleting last item you will get crash due to IndexOutOfBoundsException.


Usually we add following line to remove an item from the RecylcerView. 

.....
mDataList.remove(position);
notifyItemRemoved(position);
.....


Possible Resolution : 
1. We can avoid this by simple calling notifyDataSetChanged() which resets the complete list but using this the added animation with item placement in event of addition or deletion. Also it is an expensive call in comparsion to notifyItemRemoved() or notifyItemInserted().

2. But to resolve this issue along with animation up, we need to add one more method call just below the above two method calls

.....
mDataList.remove(position);
notifyItemRemoved(position);
notifyItemRangeChanged(position, mDataList.size());
.....

It just resets the RecylerView and hence index of list items get updated.


More : 
1. Similar issue can also be seen when you add a new item to the RecyclerView at any position.
2. And in that case notifyItemInserted() is called and should be followed by notifyItemRangeChanged() .


Please comment in case of any clarifications.


Monday, 14 September 2015

Always Visible Multiple InfoWindows on Google Map


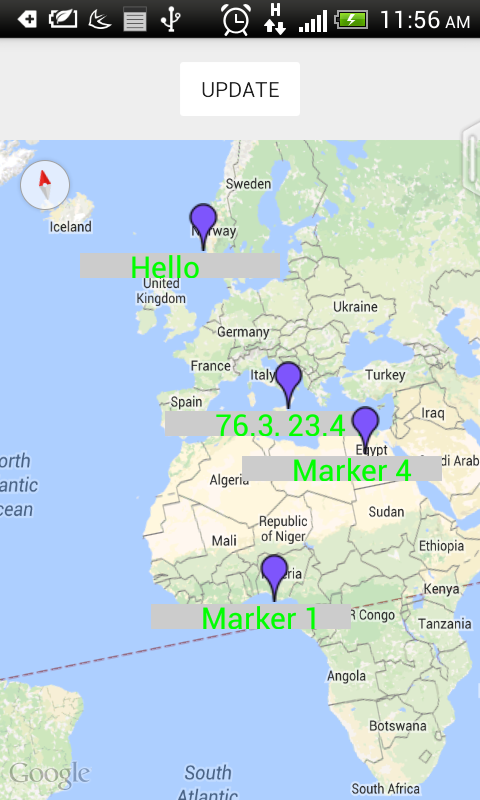
This post is about resolution of an issue that I faced when I started working on a requirement in which multiple info windows were supposed to be shown and that too simultaneously.

Conventionally there is no such method/class in Google maps api that could allow developers to implement this functionality. Though we can add multiple markers default or customized with an attached infowindow but cannot show all the infowindow simultaneously.


Prerequisite : 
Get google map key for your map to be launched correctly. Please following link to create one
https://developers.google.com/maps/documentation/android-api/signup


Alternative:
Whatever. Above feature is highly needed along with autoupdating the content on the info window.
Never knew Markers were enough to replicate it into an infowindow too.


Conception: 
We will be going to create custom Markers in which we will draw all the information as bitmap and then set it to the markers icon property using

customMarkerOption.icon(BitmapDescriptorFactory.fromBitmap(createMarkerBitmap("76.3, 23.4 75%"))));


where customMarkerOption is an instance of MarkerOptions and createMarkerBitmap() is the method that creates bitmap using the content to be shown on map.


private Bitmap createMarkerBitmap(String iMarkerText) {
         Bitmap.Config conf = Bitmap.Config.ARGB_8888;
         Bitmap bmp = Bitmap.createBitmap(200, 100, conf);
         Canvas canvas = new Canvas(bmp);
 
         canvas.drawRect(0,75,200,175, mMarkerContainerPaint);
         canvas.drawBitmap(BitmapFactory.decodeResource(getResources(),R.drawable.purple_marker),100,25,mMarkerTextPaint);
         canvas.drawText(iMarkerText, 50, 100, mMarkerTextPaint);
 
         return bmp;
     }


You can set up the map and use MarkerOptions instances above to create markers on map. And the content will also update automatically.

You can get the complete source for the demo app here.
MapDemos


Please check and let me know in case of issues.

Tuesday, 23 June 2015

Issues with Animators


What are animators ? Why do we need them ? What is the difference with the conventional view animations ? How animators are implemented in android ?


Well today in this post I will not talk about these, instead I will put light on some issues that I faced while working and came to know about the reason very late.

The main issues that I noticed are :

1. I cannot reuse an ObjectAnimator and AnimatorSet object to get it usable for multiple views.
2. I cannot clear animation from my view. I mean resetting the view to its original position.

So after delving deeply into the android developer docs I reached to the following solutions at the time of writing :

1. Clone the create ObjectAnimator and AnimatorSet object to create a completely different copy of that object which could be used easily with a new view.
2. To get the reset functionality for animator set, we should be creating an animator that animates the same property to back to its original state(reverse action of the animator).


Please comment in case of issues :

Wednesday, 1 April 2015

Simplest steps to integrate Parse for push notifications in Android

This blog entry is about how to fastly integrate Parse for push notifications in android. It only provide information on how to get started with the Parse's sample and the flow for most basic configurations.

Prerequisites : 

Signup into the www.parse.com. Create a project which will generate few keys like APPLICATION ID and CLIENT KEY to be used later in the project while integrating sdk.

Integration and Configuration:

1. Make a quickstart by navigating to this url https://www.parse.com/apps/quickstart
2. Select the Push options.
3. Select Android
4. Out of the two options : Create a new project and Add to existing project. Choose what you want to do ?

5. Choosing New Project will take you to https://www.parse.com/apps/quickstart#parse_push/android/new
Follow the steps on this page to make respective changes in the source files : Well you can find this step defined in the app properly

5.1 Download the the project and import it in the android studio.
5.2 We will need to connect to parse. This will require us to edit some of the files in the project.

5.2.1 Edit the Application class's onCreate() method

             public void onCreate() {
                // Replace the APPLICATION ID and CLIENT KEY with the one created for a project
                Parse.initialize(this, "APPLICATION ID", "CLIENT KEY");
             }

5.2.2 Add the following service and broadcast receiver definitions to AndroidManifest.xml immediately before the closing </application> tag:


<service android:name="com.parse.PushService" />
<receiver android:name="com.parse.ParseBroadcastReceiver">
  <intent-filter>
    <action android:name="android.intent.action.BOOT_COMPLETED" />
    <action android:name="android.intent.action.USER_PRESENT" />
  </intent-filter>
</receiver>
<receiver android:name="com.parse.ParsePushBroadcastReceiver"
    android:exported="false">
  <intent-filter>
    <action android:name="com.parse.push.intent.RECEIVE" />
    <action android:name="com.parse.push.intent.DELETE" />
    <action android:name="com.parse.push.intent.OPEN" />
    </intent-filter>
</receiver>
<receiver android:name="com.parse.GcmBroadcastReceiver"
    android:permission="com.google.android.c2dm.permission.SEND">
  <intent-filter>
    <action android:name="com.google.android.c2dm.intent.RECEIVE" />
    <action android:name="com.google.android.c2dm.intent.REGISTRATION" />
 
    <!--
      IMPORTANT: Change "com.parse.starter" to match your app's package name.
    -->
    <category android:name="com.parse.starter" />
  </intent-filter>
</receiver>


Change the android:name attribute of <category> element above to match your application's package name.

Also add the permissions below, typically immediately before the opening <application> tag:


<uses-permission android:name="android.permission.INTERNET" />
<uses-permission android:name="android.permission.ACCESS_NETWORK_STATE" />
<uses-permission android:name="android.permission.WAKE_LOCK" />
<uses-permission android:name="android.permission.VIBRATE" />
<uses-permission android:name="android.permission.RECEIVE_BOOT_COMPLETED" />
<uses-permission android:name="android.permission.GET_ACCOUNTS" />
<uses-permission android:name="com.google.android.c2dm.permission.RECEIVE" />
 
<!--
  IMPORTANT: Change "com.parse.starter.permission.C2D_MESSAGE" in the lines below
  to match your app's package name + ".permission.C2D_MESSAGE".
-->
<permission android:protectionLevel="signature"
    android:name="com.parse.starter.permission.C2D_MESSAGE" />
<uses-permission android:name="com.parse.starter.permission.C2D_MESSAGE" />


Change the android:name attribute of <category> element above to match your application's package name.

5.2.3 Compile and run.

6. Similarly follow all the substeps just as in step 5 to do the Parse integration in android sdk.


Testing for push notifications : 

OK, now you are done with the most basic integration so you are good to go for testing.

7. Navigate to https://www.parse.com/apps to open dashboard containing all your projects created till now. Select the current project and the select the "Push" option.

7.1 Now here you will find an option/button to send a push message. You can also see the notification history if any notifications send previously.
7.2 Once selected one can also find a box to create a message to be sent. And the settings to choose the devices that can receive the notifications.
7.3 Also you can update the time of delivery of notification
7.4 Once message is configured properly, it can be pushed to the devices.


8. If everything is fine, app will receive the notifications and on clicking notification it will launch the application with the launcher activity. 

Ok ,you are done here with the integration of Parse for push notifications in android. 
Wait .... We are missing something .... ?
Don't you want to use one of the icon for the notification from your app reserve rather than default icon ? I know you are dying to add .
Don't you want to an implementation specific to your app like an desired activity to be launched. Yes you always wanted to drive
So we will do it in our app by creating our app's version of class com.parse.ParsePushBroadcastReceiver which allows to customize notification and implementation on receiving push message.


public class MyReceiver extends ParsePushBroadcastReceiver {
  
     @Override
     protected Notification getNotification(Context context, Intent intent) {
         final Notification notification = super.getNotification(context, intent);
  // TODO Update this notification here          
         return notification;
     }
 
     @Override
     protected void onPushOpen(Context context, Intent intent) {
  //TODO For app specific implementation comment the following line calling super version of this method  
  // super.onPushOpen(context, intent);

  //TODO Add App Specific implementation below
         Intent lastIntent = new Intent(context,SecondActivity.class);
         lastIntent.addFlags(Intent.FLAG_ACTIVITY_NEW_TASK);
         context.startActivity(lastIntent);
     }
}


This is just a brief walk through of Parse for push notifications in android. It is a very big thing in itself. Parse is a collection of multiple sdks for various platform.

References: https://www.parse.com/

Source: https://github.com/Keshava11/parsecheck

Thursday, 15 January 2015

Enable detection of USB Devices on Ubuntu


You just connected your android device to the system to begin debugging and found nothing but ????? under the Devices window in your IDE. Now what ?

To get the device running on the Ubuntu we will need to register all the devices with a udev file which contains usb configuration for each device connecting to the system.
In the udev rules file each device manufacturer is identified by a unique vendor id as specified by ATTR{idVendor}.

Main steps :
1. Open terminal, assuming you are at home directory
    write command to change directory i.e. <cd ..> {without arrows} twice.
    Now change directory to <cd etc/udev/rules.d/> {without arrows}

2. Write command with root access to create a file
    $ sudo gedit 51-android.rules
    It will prompt for password : enter your system's root password
    It will create and open up the file with gedit (or you can use the editor of your choice too).

3. Now you will need to add entries corresponding to each device you are going to connect to your system.
And the format for those entries is as follows :
   SUBSYSTEM=="usb", ATTR{idVendor}=="0bb4", MODE="0666", GROUP="plugdev"
   where "0bb4" is the vendor id for HTC found along side more other manufacturers in the list at
   http://developer.android.com/tools/device.html#VendorIds

   Also the MODE assignment specifies read/write permissions, and GROUP defines which Unix group owns the device node.

4. Once you are done with the above step, close the gedit or the editor you were using to edit the file.

5. Now we will change the permissions for the new created rules file as follows:
  $ chmod a+r /etc/udev/rules.d/51-android.rules

Really! In what world ? 
  If in any case you had restarted your terminal just after editing the file and hence getting the Operation not permitted error for the above 5th step,
  then you got to run the above command with sudo at the first place and again entering password when prompted for.
  $ sudo chmod a+r /etc/udev/rules.d/51-android.rules

6. Once done, you are good to go to play with your device connected to your machine.


Connect your device with usb debugging ON to the machine. And here you are annoyed one more time by a prompt on the device to check the Allow USB debugging dialog box.
But don't worry this will be last time you will be bugged.

Here is the sample file 51-android.rules file containing most vendor details about most used devices in the world. If you didn't found your device, please match with the above given vendor id's
and add one for yours.

Above list contains vendor Id's for Samsung, Motorola, Sony, Google, LG, Lenovo, Acer, Asus, Intel, Huawei etc.

Monday, 1 December 2014

Resolving Last ShutDown State (Normal or Abrupt)

This blog post is about how to resolve if the last device shutdown happened normally or abruptly.

Actually the problem with which this post was started was to check in an application whether the last shutdown happened abruptly with a battery detachment.

But since there is no broadcast intent available to check for the  battery detachments. It means there is no direct way to deduce whether the last shutdown was caused by detaching battery from the device.

So we started to reduce the problem firstly to check if the last state was simply normal or abrupt. And then in later posts if possible finding the reason for the abrupt shutdown was due to the detaching of battery.

The two parts are :
1. First part mainly deals with the checking of the app that whether the last shutdown was successful or not.
2. Second part mainly deals with checking if last shutdown was abrupt and was due to battery detachment

Here in this post we will only deal with the first part.

Important point :
This investigative implementation is totally based upon the fact that the intent with action ACTION_SHUTDOWN is never called by the system before going dead when it happens abruptly.

We can accomplish the first problem of resolving reason of shutdown by implementing BroadcastReceiver that listens for two broadcast intents with actions namely ACTION_SHUTDOWN and BOOT_COMPLETED.

We will be achieving our this task by saving a value (currently in Preferences) when system sends broadcast for ACTION_SHUTDOWN and checking its value when device is rebooted and system send a broadcast for BOOT_COMPLETED.

Implemented classes are :

BroadcastReceiver

public class DisconnectReceiver extends BroadcastReceiver
{
 @Override
 public void onReceive(Context context, Intent intent)
 {
  if (intent.getAction().equalsIgnoreCase(Intent.ACTION_BOOT_COMPLETED))
  {
   int shutDownCode = PreferenceManager.getDefaultSharedPreferences(DroidApplication.getsContext()).getInt(
     DisconnectConstants.KEY_NORMAL, 0);

   // Checking for the last shutdown value (1 = Normal ShutDown and 0 = Abrupt ShutDown )
   if (shutDownCode == 1)
   {
    // Reset the last value
    Editor editor = PreferenceManager.getDefaultSharedPreferences(DroidApplication.getsContext()).edit();
    editor.putInt(DisconnectConstants.KEY_NORMAL, 0);
    editor.commit();

    // TODO Here goes the user code to be implemented 
    
   }
   else if (shutDownCode == 0)
   {
    // TODO Here goes the user code to be implemented 
    
   }
  }
  else if (intent.getAction().equalsIgnoreCase(Intent.ACTION_SHUTDOWN))
  {
   // Saving value in Preferences for ShutDown broadcast
   Editor editor = PreferenceManager.getDefaultSharedPreferences(DroidApplication.getsContext()).edit();
   editor.putInt(DisconnectConstants.KEY_NORMAL, 1);
   editor.commit();
  }
 }
}

Changes in AndroidManifest.xml

Under <manifest> tag

<!-- Permission for getting RECEIVE_BOOT_COMPLETED -->
    <uses-permission android:name="android.permission.RECEIVE_BOOT_COMPLETED" />

Under <application> tag

<!-- Receiver to checks for broadcast for ACTIONs : ACTION_SHUTDOWN and ACTION_BOOT_COMPLETED -->
 <receiver android:name="com.droidutility.disconnect.utils.DisconnectReceiver" >
  <intent-filter>
   <action android:name="android.intent.action.ACTION_SHUTDOWN" />
   <action android:name="android.intent.action.BOOT_COMPLETED" />
  </intent-filter>
 </receiver>


Please check here the code added in a library project with usage instructions in README.md.
 

Monday, 24 November 2014

Setting up GPE and running an AppEngine Connected Android Project on Emulators and Devices

This is a simple post that provides a quick walk-through to setup Google Plugin for Eclipse (GPE) and then running  the sample App Engine connected android project on the real devices and on emulators.

Actually this post is more about getting the project running on the android device and emulators rather than configuration of Google Plugin for Eclipse because there will not be any changes in the steps to configure it from the official documentation.

Apart from setting up GPE, there is one more important configuration step that is required to carry on with the a project i.e creating project entry in the Google Api console.

So now we will go through in steps to setup GPE to create an App Engine Connected android project.


1. Setting Up GPE :

    Simplest way to setup the plugin is from this link
    https://developers.google.com/eclipse/docs/updating_the_plugin

    Choose the plugin download and install link based upon the version running on your system ie. out of the following supported eclipse versions
        a. Google Plugin for Eclipse 4.3 (Kepler).
        b. Google Plugin for Eclipse 4.2 (Juno).   
        c. Google Plugin for Eclipse 3.7 (Indigo).


2. Create Project on API Console

    Apart from setting up GPE, there is one more important configuration step that is required to carry on with the a project i.e creating project entry in the Google Api console(https://code.google.com/apis/console).

    As project is created you will need to create a server key by navigating to API's and Auth menu under your project. Then choose Credentials sub-menu where you can find an option to create keys. Click on it and choose Server key to proceed which will then create a server key. 

Current sample requirement : You will need to enable Google Cloud Messaging for Android service from the API's section as it is a part of our sample app.
      
    Keep an account of both the project number and this created server key which will be used when you will begin with creation of project in eclipse.


3. Create New Project in Eclipse
    Create a new app engine connected android project in eclipse by choosing
    File -> New Project -> Android -> App Engine Connected Android Project .
    https://developers.google.com/eclipse/docs/endpoints-androidconnected-gae

    Note :
    Since here the project created from the New Project wizard is an android project which has an app engine backend.

    The sample Android app registers with the backend via an Endpoints API and receives messages from the backend via Google Cloud Messaging for Android. The sample app consists of required boilerplate code along with sample code that can be easily replaced by your own app code.

    The App Engine backend provides an API to register Android clients and a Web UI to broadcast messages to clients.

 Above wizard creates two projects in the workspace, one is android client and other a web application (Backend app) which provides an api for the clients.

Please note that we will not be covering how Cloud EndPoints api is used to register with the backends.

Now you can see that there are two projects in the workspace. Clean and build the complete workspace or you can simply do for the two projects.

The major tasks that we will be covering in this project are :
1. Running app engine server project on local machine. You can also deploy this application on cloud and  then make use of it. In our case we will be running it on our local machine.

2. Running android client both on android devices and emulators.

Once done with the build process successfully, you are good to go with the launch of the android app and app engine based project.

Here we go with the required changes in the two projects to get them running on the real android device and emulators.

Case 1: Using emulators to run android client.
        Web Project :
         Clean and build the web project and run it as web application.

        Android Project :
        In CloudEndpointUtils.java file update the value of constants :
                    -> LOCAL_ANDROID_RUN = true;
      
Clean and build the android project and run it as web application.


Case 2: Using android devices to run android client
          Web Project :
         a. Update the arguments value under Run as -> Run Configurations -> WebApplication ->   Select the Project -> Select Arguments -> Add this ahead --address=0.0.0.0 ahead of  --port=8.8.8.8
                and final value will something like
                --address=0.0.0.0 --port=8888 F:\WorkSpaceDroid\PlayCloudEPoints-AppEngine\war
          b.
Clean, build and run the project again

         Android Project :      
       
In CloudEndpointUtils.java file update the value of constants :
                    -> LOCAL_ANDROID_RUN = true;
                    -> LOCAL_APP_ENGINE_SERVER_URL_FOR_ANDROID ="your_machine_ipv4_address:8888";


Please add comments if you face any issues.